

Whether you are looking to remodel your home and replace your old kitchen sink, or simply no longer like the style of your current sink, there are many factors you need to consider when replacing your old kitchen sink.
Although replacing a kitchen sink can be easy, it’s essential you understand the time, effort, and total replacement costs so you truly understand everything involved prior to replacing your kitchen sink.
Many people may believe that to replace an old kitchen sink, you need a professional. However, this is not the case. You can replace your old kitchen sink on your own. Yet, it’s important you are prepared with all the necessary kitchen replacement tools prior to jumping right in.
In this article, you’ll learn all the steps you need to know about how to successfully replace a kitchen sink.
How To Replace An Old Kitchen Sink With A New Sink
When it comes to replacing your kitchen sink, there are a variety of “phases” involved to properly replace your kitchen sink without feeling stressed, overwhelmed, and wasting valuable time and effort.
Therefore, in this article, we’ve subdivided content into three “phases” (preparation for sink replacement, old kitchen sink removal, and new sink installation) so you are prepared each step of the way to install your new, gorgeous kitchen sink.
Preparation Of Kitchen Sink Replacement

Before you go all in on replacing your kitchen sink, it’s important to be aware of how much replacing your sink will cost, how long the replacement will take, as well as other potential risks and tools needed for a successful kitchen sink replacement.
Here are 5 steps you should follow to be fully prepared prior to removing your old kitchen sink.
Step 1: Understand The Average Kitchen Sink Replacement Costs
There are a variety of costs to consider when wanting to replace your kitchen sink. The first cost to consider is whether you want to go the DIY route and replace your kitchen sink on your own. Or, whether you want to hire a contractor to help you with your kitchen sink replacement process.
If you choose to replace your kitchen sink on your own, this will be cheaper; however, you still have to take into account the tools and new sink costs. The cost to buy all the necessary tools could cost between $50 to $100.
Then, depending upon what type of kitchen sink you would like would be added to this total cost. Kitchen sink costs can vary depending on size, quality, and sink style. However, the average kitchen sink total costs about $300 to $600. Therefore, expect to spend anywhere from $400 to $700 on average kitchen sink replacement costs if replacing your sink on your own.
Meanwhile, if you choose to hire a contractor to remove and install your new kitchen sink for you, this will inevitably cost more. The average cost of kitchen sink replacement costs with hiring a professional would cost anywhere from $700 to $1100 (though this total can range greatly). This is because the standard kitchen sink costs anywhere from $300 to $600. Meanwhile, the professional cost for old kitchen sink removal would cost about $100, and new sink installation would cost about $300-$400.

Step 2: Know How Long It Takes To Replace A Kitchen Sink
Now that you know how much it costs to get a new kitchen sink, it’s essential you understand the amount of time and effort it takes to fully remove and install a new sink.
Although it’s relatively easy to replace a kitchen sink, the process can take up a lot of time and effort. This is especially true if you choose to replace your kitchen sink on your own.
A professional can take about two hours to replace a kitchen sink and install a new one. Whereas, if you decide to replace a kitchen sink on your own, it may take you upwards of six hours to complete.
Step 3: Decide Whether You Want To Install Kitchen Sink On Your Own Or Hire A Professional
Knowing the amount of time, effort, and money it can take to replace your sink on your own versus hiring a professional, you’re going to want to determine whether you want to hire help or not.
Yes, installing a sink can be relatively easy and a cheaper alternative. However, you should take into account that it may take you a whole day’s time to complete this task on your own.
Step 4: Tools Needed To Change A Kitchen Sink
If you’ve decided you’ll want to replace your kitchen sink all on your own, you’re going to need some essential tools to get the sink replacement process completed properly.
Some tools you’ll need to change your kitchen sink include:
- New Kitchen Sink
- Bucket
- Old Rag
- Utility Knife
- Putty Knife
- Silicone Caulk
- Clips
- Screwdriver

Removal Of Old Kitchen Sink

Once you’ve gathered together your tools, it’s time to get to work removing the old kitchen sink! You cannot complete a successful sink replacement before getting rid of the old sink first.
Step 1: Stop Water Supply and Remove Drain Trap
Ensure that you’ve turned off the water. This can be done by turning the knob that works the water supply and testing to see if the water has in fact stopped after turning the knob to stop the water.
You’ll then want to use a bucket and put it under the drain trap of the sink (curved-shaped piping under the sink) to catch any water while you unscrew the slip nuts and remove the drain trap.
Step 2: Remove Water Supply Tubes, Clips, and Any Extra Plumbing Features
Then, you’ll want to remove the water supply tubes by loosening the coupling nuts that are holding the water supply tubes and faucet tailpiece together. Have your bucket and an old rag close by in case you need to wipe any water spills from removing the water supply tubes.
You’ll also want to remove any extra plumbing added features (i.e. hand sprayers or disposals) from the sink. And, remove any clips that may be holding the sink in place.
It’s important to note that you’ll likely only have to remove such clips if you are removing an undermount sink.

Step 3: Remove Caulking And Carefully Lift Up Sink
Using a utility knife, slice through the caulking that connects the sink to the countertop. This will detach the sink from the countertop.
Once the caulking has been successfully removed, carefully lift the sink up. If you are having a hard time lifting up and out the old kitchen sink, there is likely still a feature still attaching the sink to its spot, or all the caulking wasn’t removed.
Step 4: Remove Excess Caulk
Once your old sink has been successfully removed, you’ll likely have excess caulk left over in the surrounding area where the sink was. Use a putty knife to scrape away this excess caulk and make sure you thoroughly wipe down this space.
Two Types Of Installation For New Kitchen Sink
Now that you’ve gotten your old kitchen sink out, it’s time for the good stuff-putting in your new kitchen sink! How you install your new kitchen sink will depend on whether you chose a drop-in sink or an undermount sink.
How To Install A Drop-In Kitchen Sink

Read below to find the exact steps you need to take to install your new drop-in kitchen sink.
Step 1: Install Sink Features Prior To Placing Sink
Before you put your drop-in sink into place, you’re going to want to install any sink fixtures like the faucet, disposal, and straining basket beforehand following the provided manufacturer’s instructions.
Step 2: Apply Silicone Caulk Along Countertop
Using your silicone caulk, apply the caulking along the countertop edge. For context, this should be exactly where you removed the caulking during your old kitchen sink removal process.
Step 3: Carefully Place Drop-In Sink Into Opening
Once you’re new caulking is along the counter edge, carefully put the drop-in sink into place, making sure to firmly press down along the edges once the sink is in to securely connect to the countertop. Wipe away any excess caulking before it dries.
Step 4: Connect Drain and Supply Lines
After the sink is in place, connect water supply lines, hand sprayer lines, and drain traps.
Step 5: Turn Water On
Test the water supply by turning the water on. Ensure no leaks or drips are occurring. If you notice there are unwanted leaks, turn the water off and correct the leak area accordingly.
How To Install An Undermount Sink
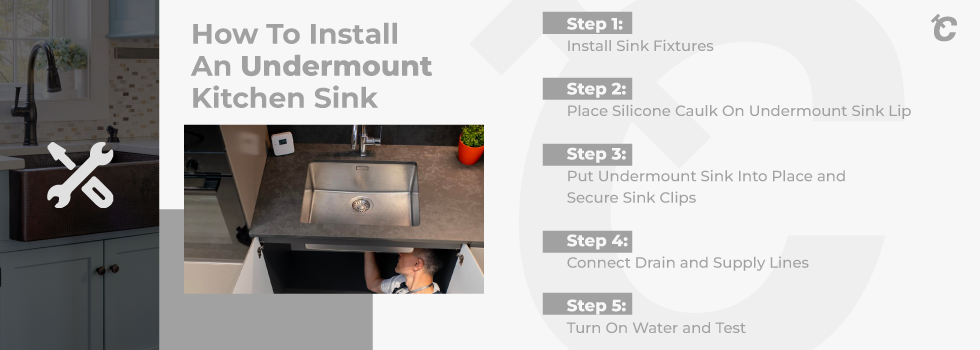
The undermount sink installation process is different than a drop-in kitchen sink installation. Read below to find the steps you need to take to install your new undermount sink.
Step 1: Install Sink Fixtures
Similar to the drop-in sink installation process, you’ll want to install all the sink fixtures like the faucets, disposal, drain baskets, etc. prior to installing the new undermount sink.
Step 2: Place Silicone Caulk On Undermount Sink Lip
Unlike placing caulking around the countertop for a drop-in sink, for an undermount sink, you’ll apply a layer of silicone caulking around the undermount sink lip. This is because you will raise the undermount sink up into place.
Step 3: Put Undermount Sink Into Place and Secure Sink Clips
Once the undermount sink has a consistent layer of caulking on the top lip part of the sink, open the lower cabinets and carefully put the sink in the exact place. Once in place, secure your undermount sink in place using clips to attach to the countertop. Work your way around the sink, clipping each hole from sink to counter.
Step 4: Connect Drain and Supply Lines
Now that your undermount sink is in place, connect the water supply lines, garbage disposal, and drain trap.
Step 5: Turn On Water and Test
Lastly, turn on the water supply and test to see if there are any leaks or drips. If there are, immediately turn off the water supply and tend to the area accordingly.
Frequently Asked Questions
Can You Replace A Kitchen Sink Without Replacing The Countertop?
Yes, you can replace your kitchen sink without damaging and needing to replace your countertop. You can use a utility knife to remove the caulking that connects the kitchen sink to the countertop. Once you’ve sliced through all the caulking (and removed all the other sink fixtures prior to this), you should be able to lift the sink out without damaging the countertop.
Can I Replace An Undermount Sink?
Yes, you can replace an undermount sink. Since the caulking was applied to the lip of the undermount sink onto the bottom of the counter, you will have to remove the caulking that is sealing both the sink and counter together.
You’ll also have clips or braces underneath holding the copper sink in place to the counter. You will also have to unclip those to replace your undermount sink.
How Do You Replace A Porcelain Kitchen Sink?
When it comes to replacing a porcelain kitchen sink, you want to first ensure you are extra careful as this type of sink is much heavier than current stainless steel style sinks.
The steps to replacing a porcelain kitchen sink are similar to those on removing an old kitchen sink listed above. This includes turning off the water source and disconnecting any supply lines/ extra sink fixtures. Then, unscrew any connectors that may be holding the sink to the counter (underneath the sink). Afterward, slice the caulking between the counter and sink using a utility knife.
Once caulking has successfully been sliced away, carefully remove the sink out of its place. Since the porcelain kitchen sink is heavier than the typical stainless steel sink, you may need someone to assist with this step.